Pages

Wednesday, September 9, 2009

Fixing the scroll wheel in the modifier menu


This usful tips I found on Autodesk Area.

PROBLEM:
When you open the modifier list and try to use the scroll wheel, the menu doesn't scroll correctly, it flickers.

SOLUTION:
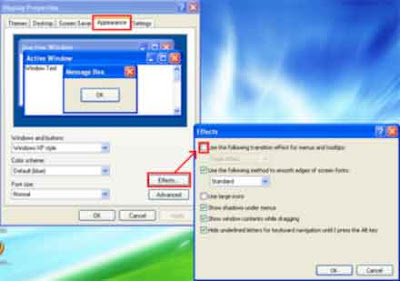
This is related to a windows display setting. Follow these instructions to fix this issue..

In Windows XP
  • click on "Start" ->
  • "Control Panel" ->
  • "Display" ->
  • "Appearance" Tab ->
  • Click on the "Effects" button
  • Turn OFF "Use the following transition effect for menus and tooltips"

That's it, your mouse wheel should now work while you are browsing through the modifier list.

Slight Modification of the process for Windows 7

  1. Start > Control Panel
  2. Performance Information and Tools
  3. Advanced Tools (on left)
  4. Adjust the appearance and performance of Windows
  5. Uncheck "Smooth-scroll list boxes"
  6. Click OK then close the control panel
Done.

Monday, September 7, 2009

Rebuilding Textures After Modifying UVs


Automatically rebuild an existing texture image after you re-adjust (partially or completely) the UV coordinates for a 3D mesh.

Path Constraint


Autodesk free video tutorial.
Learn how you can animate an object along a spline path.

Sunday, September 6, 2009

Create a rock "shader"

Description:
Video tutorial which cover how to use procedurals to create a rock texture.
Quote: "We will cover: displacement tuning in mental ray..."

Original title said: "Create a rock shader in 3DS 2010" but...
read my comments first.
  1. So first about involving mental ray here. In this tutorial has no one specific map that explicitly require the use of MR. Here used only standard procedurals maps, and why was all this MR rendering pain?
  2. Judging by the title, this one is tutorial only for Max 2010. It's also applicable in Max 2009 because here was used only one map that is a new feature in Max 2009 - namely "Color Balance". If you replace that part with a different technique, it would be entirely consistent with Max 2008, even Max 9.
  3. Author uses "Composite" layers, and except in one case, he completely fails to explain their blending settings (as "Normal", "Multiply", ...).
  4. Wrong terminology. Here shows how to compose textures, not "shaders".
  5. The last line of author is totally lame and unprofessional advice. As the final result depends on the size of the mesh on which we apply the material, author proposes to reset and redefinite each parameter of each map to lower or heighter value, instead just to aplly UVW !!!
Well, my aim is not to offend people. What I first thought is was so the author of this tutorial has a year or less experience in 3ds Max and he just wants to be popular, but after I read the biography (CV) of Alessandro Cangelosi, I was shocked. In his "software experience", he say: Mental Ray, FinalRender, VRay, Brazil R/S - advanced (7 years), 3ds max - advanced + script + most of the major plug-ins (15 years), ... and in him "work experience": CG instructor (2008-2009), Custom Shaders TD (2009). Wow! LoL! ... Are these professionals that we need to pay and which we should learn? Hey, do not judge me if you do not understand what I say. All my life I saw people with magic knowledge, skills and talent, which are unemployed. Secondly, lamers where no end, but they have a job, some of them work for prestigious companies. I continue to wonder what is wrong with this world! Would you pay a someone if he have not done a good job? Or I missed something?

Friday, September 4, 2009

Dynamic Utility Menu

DUM (Dynamic Utility Menu) is my new MaxScript online.


Smart utility menu for your scripts.
Easy customizable (noted inside the code).

Reason to make it:
Many people dont know alternative way for hot access to their scripts except installing all of them as macros (MacroScripts). MacroScripts is welcome for dozen of scripts that we use everyday,but they difficulty to menage then they come a lot.
- Why Utility, the system menu looks better?
- The utility is most compact and most comfortably for navigation.
( For that it's called utility, right? )

In conclusion I must to say so I just try and hope I helps to people to avoid MacroScripts installation for every peace of code by give them some choice.

Read more and download my MaxScript here.

Thursday, September 3, 2009

Chain

I fall a lot of tutorials for chains and most of them just start with some hard modeling techniques, also end of nowhere :) but today I discovered for the first time someone who used my favorite technique for modeling chain, ie using rectangle shape. Yep, this is a nice and easy way. This is a French video tutorial and I don't understand what he's saying but is clearly visible.

I'll sketch here a short how I modeling chain. First I just tipe in Max Listener (F11) or miniListener (located in the bottom left corner):
rectangle()

Simple, right :) It's default size is OK (width = 25 and length = 10). Now just need to turn on enable in renderer and enable in viewport, set Thikness to 3 and Corner Radius to 4.5 , and the modeling of single chain is done.

You can save all of this to script, well, not so as to optimize the task but more to skip remembering the exact values and use them to ready the next time:
ch = rectangle thickness:3 cornerRadius:4.5 \
render_renderable:true displayRenderMesh:true \
name:"Chain01" isSelected:true

Also, if you use a script that will facilitate the task and next steps. As in the French tutorial, the next step is aligning pivot and except that it is faster also becomes more accurate doing this by script:
ch.pivot.x += ch.width / 2

Variable "ch" here is a rectangle shape that I set in the above example code. So as you know the pivot is on center of the shape and we need to move by X in distance equal to half the width.

Last step of the modeling that remained was to clone our chain using Array tool. What needs to know here is the distance you have to move each new copy by X. It's not the shape width. They must touch but not intersect another so we must take into account the shape thickness and to extract Thickness from Width, ie:
ch.width - ch.thickness

Or to say in numbers: (25 - 3) = 22. So in Array tool just set 22 for move by X and dont miss to set rotate to 90 by X. Choose a type of copy and amount, and hit OK.Well, this is the end of modeling part.
As to the linking of objects, must to say, if they are too much, definitely annoying to be tied one at a time, so and for this task I use simple script. I guess you used names as main (ie "Chain01", "Chain02", ...). So collect them as array in variable "all" and by loop link everyone as child to the next one to make the link hierarchy:
all = $chain* as array
for i=1 to all.count-1 do all[i].parent = all[i+1]
Now the chain is prepared for IK.
Tuesday, September 1, 2009

Render with default lights

How to renders with default lights, even if there are lights in the scene?

I think this asked so many times online so maybe is a time the answer to become a part of official Max help documentations, right? :)

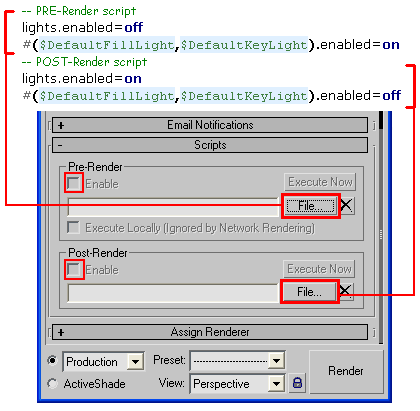
In 3dsMaxRendering blog you can find tips how to place default Max lights to the scene. That's good and useful tips. But how to switch (turn on/of) a lot of lights? The Light Lister is not a nice solving. I found an script request at the ScriptSpot forum, so the peoples still looking for automatize process tips. And there is what born in my mind... just write 2 super short and simple script (in separate files) and assign them to Pre-Render and Post-Render procedure:

And of course this way you can easy enable/disable Pre and Post render scripts at any times.

MAXScript (to copy/save):

-- PRE-Render script
lights.enabled=off
#($DefaultFillLight,$DefaultKeyLight).enabled=on
-- POST-Render script
lights.enabled=on
#($DefaultFillLight,$DefaultKeyLight).enabled=off

Modeling of an ancient column


Poly modeling for beginners.
Video tutorial by Sascha Henrichs.