Pages

Monday, January 19, 2009

Temporarily turn off


I'll be busy next month
and need to turn off
the site upgrade for a while.
See you later... :-)

FinalRender Material Converter


by 3d-io
Version: 1.00

This plugin adds a single button to your Interface. When you open it you can:

  • convert Standard to FinalRender Material
  • convert FinalRender Material to Standard Material
  • Show all (diffusemap) textures in view port

Additionally you can manually reassign the slots for the texturemaps.

Version Requirement: tested with Max 9 and Max 2009
Homepage URL: http://www.3d-plugin.com/
Download URL: http://www.3d-plugin.com/maxscripts/

Creating Realistic Fire Using Particles

Written By: Chris / Jan 25, 2008


This tutorial will walk you thru creating realistic fire using 3ds Max’s particle system. With the right particle generation, texture, and material, you can produce some fairly realistic effects.


Part 1 - Creating a Fire Material

First part explains how to create a fire texture to be applied to particles in order to create a realistic fire effect.

Start by creating a new Standard material. Under Shader Basic Parameters, choose Blinn. Choose an orange color for Ambient/Diffuse Color. I chose an RBG of
Red: 255
Green: 120
Blue: 0
Hue: 20
Sat: 255
Value: 255

Check the self illumination box and select a slighter brighter orange color. I chose
Red: 255
Green: 174
Blue: 0
Hue: 29
Sat: 255
Value: 255

So far your material should look like this.


Under maps, choose diffuse color. Pick Particle Age and hit ok.
For Color #1 choose a red color, and for Age #1 type in 20%.
For Color #2 choose an orange color and Age# 2 type in 50%
Color # pick white and Age# 3 make 100%

Go back up to the parent level by clicking on the go to parent button. Make sure the diffuse amount for the diffuse map is 100. Click on the self illumination map and choose Smoke. Under Smoke Parameters choose size: 40 and make color 1 an orange color and color 2 a yellow color.


Go back to the parent level. Under the opacity map choose Smoke. Under Smoke Parameters choose size: 40 and make the two colors pure white and pure black. Your material should look like this.


Once you have a material that looks like this you are ready to move on to particle creation and how to apply the material to the particles. If you have a strong understanding of particles, then you should be able to have a lot of fun with this material.


Part 2 - Work with Particles

Step 1 Setting up Particles

Start by creating a blizzard particle system and place it in your scene so its pointing upwards. To do this go to Create > Particles > Blizzard. Rotate the particle emitter 180 degrees so its pointing up. Under the modify panel, change the emitter size to 45 x 45.

The viewport display show how the particles will be represented in the viewport, not how the particles will be rendered. The percentage of particles displays a certain percentage in the viewport but the amount of particles rendered will always be 100%.

Step 2 Particle Generation

Under Particle Generation choose a user rate of 3. This controls how many particles are to be created per frame. Under Particle Motion choose a speed of 1.97, a variation of .276, tumble 0 and tumble rate 0. Under Particle Timing make your Emit start a negative number. You can make that negative number the amount of frames you have so that the particle generation is constant throughout the clip. My frame count is 250 so I chose an Emit Start of -250, Emit Stop and Display Until of 250. Chose 36 for Life and 34 for Variation. Under Particle Size choose 2.24, Variation 2.39, Grow For 5 and Fade For 29.
Speed of the particles determines how fast the particles are moving. Variation allows for various particles to travel at different speeds. Emit start determines when you wish to start generating particle, Emit Stop determines when you wish to stop generating particles and Display until determines which frame you wish to no longer display particles. Life determines how many frames the particle will live for. One particle will last for 36 frames in this case.

Step 3 Instanced Geometry

Under Particle Type choose Instanced Geometry. This allows the particle to be any mesh or geometry created in the scene. We are going to create a custom particle. Create in your scene a Sphere of a radius of 3.625 and 32 Segments. Now add a noise modifier to the sphere. Under the noise Parameters, choose Seed 0, Scale 4.777, Roughness 0, Iterations 4.48. Under Strength make X: -2.87, Y: 5.59, Z: 12.182. We now have a custom particle that looks pretty crazy. Go back to the particle emitter parameters. Under particle type, you should have Instanced Geometry selected. Scroll down until you see a button that says Pick Object. Click on that button and choose the sphere you just created. Right click on the sphere and choose hide selected. You no longer need to mess with the sphere. Now the particle emitter should emitting many little spheres. To see this change your viewport display from dots to mesh. (be careful as this could crash your computer) Once you have had your fill, switch back to dots to save memory.

Step 4 Adding Materials

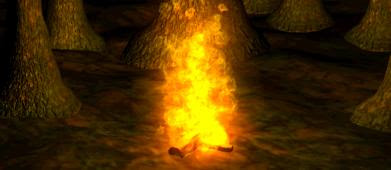
Hit M and add your material to the particle emitter by either dragging it to your emitter or hitting the assign to selection button. This will add the fire material you created to your particle system. Do a test render, you should have something that looks pretty close to fire. Under the Material ID Channel, change the ID from 0 to 1.


Step 5 Video Post

To add the final touch were going to use 3ds Max’s Video Post. Under Render choose Video Post. Click on the add scene event button. Choose Camera. If you don’t have a camera then just choose perspective. Make sure that the VP start time and VP end time match the length of your main timeline. In this case the VP start time is 0 and the VP end time is 250. Hit ok. Make sure you don’t have anything in your queue highlighted. Next click on the add image filter event button. Choose lens effect glow and hit ok. Again, make sure you have nothing in the queue highlighted. Last choose the image output event button. Click on file and choose a path to save your file. Also choose an output type. I usually use .mov for QuickTime movies.

Double click on Lens Effects Glow and click on Setup. Click the VP Preview button. This gives a general idea of what the glow will look like. Click the VP Queue button to see a preview of your scene. Under Properties check the effects ID checkbox. Make sure you have effects ID 1. Under the preferences tab change the Effect size to 7. Make sure the Color type is pixel and bring the intensity down to 1. You can play around with these preferences to get various desired effects. Under the inferno tab you can also tweak some of the Gaseous, Fiery or Electric settings for other various desired effects.

When you are ready to render out your movie, click the Execute Sequence button under the video post options. Choose your output size and time range and hit render. You may have to play around with the settings, but the general idea is to mimic movement, opacity and the brightness of fire using a combination of custom particle and post effects.

Normal Maps by Edi

Normal maps - baking, creating & correcting
by Edi_W, 2007-09-17


Very informative and detailed explanation Normal map tutorial. This tutorial will be beneficial rather games developers. It try to explain some techniques and show you how to bake and create normal maps.

Used software:
  • ZBrush 2 - for baking normal maps from high poly models.
  • 3D Studio Max - for modeling low poly models and UVW mapping.
  • Photoshop CS2 - for creating normal maps and editing baked maps.

Tutorial is avaliable in ZIPed PDF files in 3 languages:

Sunday, January 18, 2009

Xenomorphic


I wonder how I lost track of this site before.
There you will find unique tutorials for 3ds Max.
Check yourself: http://www.xenomorphic.co.uk/education.htm

Thursday, January 15, 2009

Cloud tutorial


Introduction:

In this tutorial you will learn to create a fly-through of a realistic cloud tunnel that renders relatively fast, using 3D Studio Max with no plugins or 3rd party renderers.

V-ray Window Trick

from 3D Rendering


This tutorial has been written for 3d studio max and vray, but the principle is simple and can be applied successfully in (almost) any 3d software package.

As you may already know, the way the windows look in a rendering can be a very important factor in the overall impression. However, I have noticed that many people (especially beginners) seem to neglect this aspect and the windows in their renderings are either black or mirror-like.

Here is a simple workflow that I use most of the time for adding widows to residential building renderings.

1) Take a photo of a window and crop it around the edges until you obtain a result similar to the one below. You will use this for the diffuse channel in the material editor


2) Select the drapes and paint the black. Select invert, and color it with a very light blue (almost white) color and save it under a different name. You will use this for the refraction slot of the material.
*if the windows are far enough from the camera, you may skip this step.
3) Open the material editor, select vray material and use the following settings:-diffuse channel - first bitmap-reflection channel - falloff, Fresnel-refraction channel - second bitmap

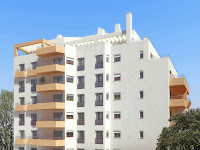
4) It may be a good idea to make a vray mtl wrapper with alpha contribution set to -1 (and keep the sub-material with the settings shown above). This way you will have an alpha channel for the windows and you could make some adjustments in photoshop after the rendering is done (color correction, adding some specular highlights, etc).


*You need repeat the workflow shown above, using several maps applied on different windows so you will have variation in your final rendering.

! One trick appended from me (blog admin):

Open some window on this building (modeling duty) will bring more reality to the final scene. :)

Wednesday, January 7, 2009

Grasses

Grasses is a sample free tutorial from http://www.3d-palace.com/


39Mb zip file including reference material & PDF.
Contain Chapter 21 - Grasses
form the book Deconstructing the Elements with 3ds max 6.
Get it from here (Download) ;)


Deconstructing the Elements with 3ds max 6 in Amazon.com

Tuesday, January 6, 2009

Motion Blur with 3dsmax

Author: Nils Norgren


The aim of most 3D artists is "photo realism" when generating an image in 3ds Max. Along the same lines when the aim is animation, the goal should be "film quality." One of the most important and overlooked elements of film is motion blur.


The motion blur occurs in a film camera due to the shutter. The shutter is a rotating disk (yellow). The opening can be adjusted wider or narrower, but the standard opening size is 180º. This means that for every frame that represents 1/24 of a second, there is 1/48 of a second of blur (image that is exposed on a frame of film). In most parts of Max, the settings are from 0 to 1 - 1 being blurred for a full frame. Taking the 180º would indicate that the setting should be set to .5 in this case.

Film is shot at 24 frames per second, which accounts for the "choppiness" in shots when cameras move quickly or in a direction that accentuates the motion, like a fast pan or fast trucking shot. Video is 30 frames per second, but really when rendering to fields there are 60 separate time representations during the 30 frames of actual video.

All of these advantages have one major caveat, motion blur. When rendering at so few frames per second, there needs to be something to visually stitch the frames from one to the next. This will get the viewer's eye (and brain) to blend the frames and perceive smooth motion.

One common occurrence is when a scene is getting ready to render, and the artist enables the motion blur. They panic; they perceive that the image is degraded to an unacceptable level. The problem with this is that the artist is looking at a still frame. If they could see the shot moving, they would see the improvement over no motion blur.


The key to motion blur is figuring out a cost-effective way of achieving it. There are three basic ways of calculating motion blur. The first way is 2d motion blur, the second is 3d blur, and the third is multi-pass.

2d motion blur is the standard as it is the easiest and quickest. It is usually very fast to render and (as you would expect) gives the worst results. The most common type of 2d blur in Max is "Image" motion blur, or the render effect "Motion Blur." The results depend greatly on the scene, amount of blur and type of movement. The way that the motion blur is calculated is that after the frame is rendered, the direction of each part of the scene is computed and the image is blurred based on the direction of vertices of the objects in the scene. Some things fall right out first off; shadows (of moving, blurry objects) don't get blurred, same for reflections of moving objects. Sometimes the blur will be noticeable based on the number of vertices in the scene. There is also a big problem when there are transparencies in the image. There is a work with transparency in the render effect, but I have never seen it work. If the camera passes near a transparent plane, the scene is blurred based on the faster moving plane, causing a rendering artifact.

There is one big gotcha when using 2d motion blur. If objects change their topology during a shot, the motion blur calculation will be thrown off, and you will get all sorts of crazy renders. This happens most often when using the "Slice" Modifier.

Another type of 2d motion blur is a blur that is added in post, based on a vector pass. It is rendered as a separate file, or embedded as a separate pass within the main beauty pass (which in this case would have no motion blur, until you add it in post).

The second type of blur is 3d rendered blur. This type can greatly increase render times but give a much more realistic blur. This is the type of blur you get if you use "Object" motion blur or "Motion blur" inside the Vray or Mental Ray render dialog.


To enable image or object motion blur when using scanline rendering, simply select the objects (all objects) and right-click. Then select object properties, and enable "Image" under motion blur type.


When using Vray, it is necessary to enable the render effect motion blur. Go to Rendering -> Effects and add a motion blur effect to the rendering (make sure to set it to about “.5”).


The most expensive way of getting motion blur is to use multi-pass rendering. This solution is achieved by selecting the camera, enabling the multi-pass feature, and selecting "Motion Blur." This blur is achieved by rendering the scene multiple times, at specified time offset, and blending the resulting frames together. The default setting for this type can be turned down somewhat. I have used as few as six passes without noticeable stuttering, in certain circumstances. There is one cool feature buried here. You can "Preview" your motion blur in the viewport. There is also a "Use Multi-pass Camera Effect" when making a preview. Remember to turn it off if you plan on using another type of blur for the final output.


There are many things that are becoming more and more required in 3d rendering, we now take for granted ray-tracing, area shadows, global illumination, multiple choices of anti-aliasing strategies, but for film-quality productions motion blur should be a fundamental requirement of the rendering strategy.

Motion blur should be considered within the larger issue of edge quality. One thing that has changed much in the last five years is the quality and strategy of Anti Aliasing. There are still problems that are very difficult to deal with (like geometry that is much smaller than a pixel) but there are many new innovations in this arena that will lead to more "Film quality" renderings right out of the renderer.


Tip

There is a great advantage when working at film frame rate when creating animation. You have six less frames to render per second (rendering savings). This also means that for every second of compressed footage, you can devote 1.25 times more throughput (quality of compression) per frame.

Monday, January 5, 2009

VTC - Autodesk 3ds Max 2009

Course: Autodesk 3ds Max 2009
Author: Sandeep Kulkarni
SKU: 33937
ISBN: 1-935320-09-2
Release Date: 2008-11-13
Duration: 12 hrs / 142 tutorials
Work Files: Yes
Captions: No

Autodesk® 3ds Max 2009 is a mature, robust, full-featured 3D modeling and animation application used by the world's top 3D professional artists and designers. In this course students are first introduced to the 3ds Max User Interface and how to customize it for better understanding and workflow. Students will then learn about the basic 2D tools and how to make simple models in Max, before getting into more in-depth understanding of the 3D modeling tools. The instructor moves on to introduce Lighting, Cameras and Rendering followed by the Materials Editor and Animation tools. Later in the course, the author discusses Particle Systems, Effects and Simulation within 3ds Max and even includes a chapter that introduces "Character Rigging". Work files are included. To begin learning Autodesk® 3ds Max 2009 today, simply click on the links.