The aim of most 3D artists is "photo realism" when generating an image in 3ds Max. Along the same lines when the aim is animation, the goal should be "film quality." One of the most important and overlooked elements of film is motion blur.

The motion blur occurs in a film camera due to the shutter. The shutter is a rotating disk (yellow). The opening can be adjusted wider or narrower, but the standard opening size is 180º. This means that for every frame that represents 1/24 of a second, there is 1/48 of a second of blur (image that is exposed on a frame of film). In most parts of Max, the settings are from 0 to 1 - 1 being blurred for a full frame. Taking the 180º would indicate that the setting should be set to .5 in this case.
Film is shot at 24 frames per second, which accounts for the "choppiness" in shots when cameras move quickly or in a direction that accentuates the motion, like a fast pan or fast trucking shot. Video is 30 frames per second, but really when rendering to fields there are 60 separate time representations during the 30 frames of actual video.
All of these advantages have one major caveat, motion blur. When rendering at so few frames per second, there needs to be something to visually stitch the frames from one to the next. This will get the viewer's eye (and brain) to blend the frames and perceive smooth motion.
One common occurrence is when a scene is getting ready to render, and the artist enables the motion blur. They panic; they perceive that the image is degraded to an unacceptable level. The problem with this is that the artist is looking at a still frame. If they could see the shot moving, they would see the improvement over no motion blur.

The key to motion blur is figuring out a cost-effective way of achieving it. There are three basic ways of calculating motion blur. The first way is 2d motion blur, the second is 3d blur, and the third is multi-pass.
2d motion blur is the standard as it is the easiest and quickest. It is usually very fast to render and (as you would expect) gives the worst results. The most common type of 2d blur in Max is "Image" motion blur, or the render effect "Motion Blur." The results depend greatly on the scene, amount of blur and type of movement. The way that the motion blur is calculated is that after the frame is rendered, the direction of each part of the scene is computed and the image is blurred based on the direction of vertices of the objects in the scene. Some things fall right out first off; shadows (of moving, blurry objects) don't get blurred, same for reflections of moving objects. Sometimes the blur will be noticeable based on the number of vertices in the scene. There is also a big problem when there are transparencies in the image. There is a work with transparency in the render effect, but I have never seen it work. If the camera passes near a transparent plane, the scene is blurred based on the faster moving plane, causing a rendering artifact.
There is one big gotcha when using 2d motion blur. If objects change their topology during a shot, the motion blur calculation will be thrown off, and you will get all sorts of crazy renders. This happens most often when using the "Slice" Modifier.
Another type of 2d motion blur is a blur that is added in post, based on a vector pass. It is rendered as a separate file, or embedded as a separate pass within the main beauty pass (which in this case would have no motion blur, until you add it in post).
The second type of blur is 3d rendered blur. This type can greatly increase render times but give a much more realistic blur. This is the type of blur you get if you use "Object" motion blur or "Motion blur" inside the Vray or Mental Ray render dialog.

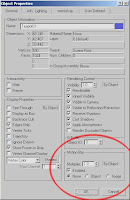
To enable image or object motion blur when using scanline rendering, simply select the objects (all objects) and right-click. Then select object properties, and enable "Image" under motion blur type.

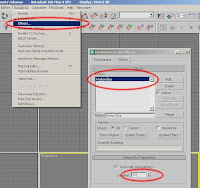
When using Vray, it is necessary to enable the render effect motion blur. Go to Rendering -> Effects and add a motion blur effect to the rendering (make sure to set it to about “.5”).

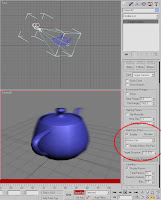
The most expensive way of getting motion blur is to use multi-pass rendering. This solution is achieved by selecting the camera, enabling the multi-pass feature, and selecting "Motion Blur." This blur is achieved by rendering the scene multiple times, at specified time offset, and blending the resulting frames together. The default setting for this type can be turned down somewhat. I have used as few as six passes without noticeable stuttering, in certain circumstances. There is one cool feature buried here. You can "Preview" your motion blur in the viewport. There is also a "Use Multi-pass Camera Effect" when making a preview. Remember to turn it off if you plan on using another type of blur for the final output.
There are many things that are becoming more and more required in 3d rendering, we now take for granted ray-tracing, area shadows, global illumination, multiple choices of anti-aliasing strategies, but for film-quality productions motion blur should be a fundamental requirement of the rendering strategy.
Motion blur should be considered within the larger issue of edge quality. One thing that has changed much in the last five years is the quality and strategy of Anti Aliasing. There are still problems that are very difficult to deal with (like geometry that is much smaller than a pixel) but there are many new innovations in this arena that will lead to more "Film quality" renderings right out of the renderer.
Tip
There is a great advantage when working at film frame rate when creating animation. You have six less frames to render per second (rendering savings). This also means that for every second of compressed footage, you can devote 1.25 times more throughput (quality of compression) per frame.


No comments:
Post a Comment
Thanks for your comment