from 3D Rendering
This tutorial has been written for 3d studio max and vray, but the principle is simple and can be applied successfully in (almost) any 3d software package.
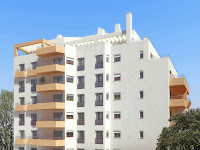
As you may already know, the way the windows look in a rendering can be a very important factor in the overall impression. However, I have noticed that many people (especially beginners) seem to neglect this aspect and the windows in their renderings are either black or mirror-like.
Here is a simple workflow that I use most of the time for adding widows to residential building renderings.
1) Take a photo of a window and crop it around the edges until you obtain a result similar to the one below. You will use this for the diffuse channel in the material editor


This tutorial has been written for 3d studio max and vray, but the principle is simple and can be applied successfully in (almost) any 3d software package.
As you may already know, the way the windows look in a rendering can be a very important factor in the overall impression. However, I have noticed that many people (especially beginners) seem to neglect this aspect and the windows in their renderings are either black or mirror-like.
Here is a simple workflow that I use most of the time for adding widows to residential building renderings.
1) Take a photo of a window and crop it around the edges until you obtain a result similar to the one below. You will use this for the diffuse channel in the material editor

2) Select the drapes and paint the black. Select invert, and color it with a very light blue (almost white) color and save it under a different name. You will use this for the refraction slot of the material.
*if the windows are far enough from the camera, you may skip this step.

3) Open the material editor, select vray material and use the following settings:-diffuse channel - first bitmap-reflection channel - falloff, Fresnel-refraction channel - second bitmap

4) It may be a good idea to make a vray mtl wrapper with alpha contribution set to -1 (and keep the sub-material with the settings shown above). This way you will have an alpha channel for the windows and you could make some adjustments in photoshop after the rendering is done (color correction, adding some specular highlights, etc).
*You need repeat the workflow shown above, using several maps applied on different windows so you will have variation in your final rendering.
! One trick appended from me (blog admin):
Open some window on this building (modeling duty) will bring more reality to the final scene. :)


No comments:
Post a Comment
Thanks for your comment