Pages

Wednesday, December 31, 2008

Happy New Year!


HAPPY NEW YEAR @ ALL !!

Tuesday, December 30, 2008

Dolphin Animation

by Didik Wijaya

See this complete tutorial from www.escalight.com
Cover process from how to model and texture a dolphin to how to animate it without bones.

  1. Modeling A Dolphin -- Part 1 * Part 2 * Part 3 * Part 4
  2. Texturing A Dolphin Using Unwrap UVW -- Link
  3. Creating Dolphin Animation (Using Path Deform) -- Link

Monday, December 29, 2008

Free Maxscripts: Curtainwall and Material Lister

Two useful 3ds Max scripts by reFORM Studios are available for download.

Curtainwall - The Curtainwall Wizard allows you to take any polygonal object and convert it into a curtainwall system; complete with glass, mullions, and silicon joints. The resulting curtainwall is parametric so you can make changes to the base mesh and it will update model in realtime. Please note that this Maxscript is only a beta release and new features such as glass chamfer, randomize ID, jitter, attach and mullion chamfer will be implimented soon.

Material Lister - The material lister provides a means to view all the scene materials in list format along with the most commonly used parameters. Ideal for trying to find that rogue material or parameter.

>> Download Maxscripts

Sunday, December 28, 2008

Car Paint: Easy Setup

There is always many ways to do something.
Final result dependence from many factors.
This is a quick setup to get started only.


Start with a Raytrace material,
and use a "Falloff" material for the Diffuse spot.

Change the Falloff Type to "Fresnel".
Change the top color to the color you want the paint to be,
and the bottom color to solid Black.

Now back to the Main material,
and use Falloff for the Reflection as well.
Again change the Fallof type to Fresnel.
Leave the bottom color at White,
and change the Black material to a very dark grey (Value of about 15).

Back to the Main material now,
change the Specular level to about 120,
and the Glossiness to about 60.

Now your ready to go!

Saturday, December 27, 2008

3D Studio MAX Hotkeys

3D Studio MAX offers a great Advanced mod feature, also Fullscreen mod, really clear workspace, but without hotkeys it will be very uselessly. Even you dont use this powerful interface option, creating 3D art is a time-consuming activity, and using hotkeys and the mouse efficiently can save you tons of time. As you know, the mouse is an easy to learn in working process but you need to spend some time looking up the hotkey.

Press F1 or search for Default Keyboard Shortcuts in the 3D Studio MAX user reference, you should be able to find a complete overview.

In addition to the default keyboard shortcuts, you can use the following procedure to create a custom keyboard shortcut:
  • Choose Customize menu > Customize User Interface > Keyboard panel.
  • Use the Group and Category lists to find the action for which you want to create a shortcut.
  • Click action in the Action list to highlight it.
  • In the Hotkey field, enter the keyboard shortcut you want to assign to the action.
  • Click Assign.

Friday, December 26, 2008

Reverse Rendering Using Video Post

Writen by Magic Wand


Hi everyone... Do you have any idea about Reverse Rendering? Means Rendering the Forward animation reversely in 3ds Max?? or Rendering the same scene using 2 Cameras at the same time?

Today we are going to discuss some tricks and tips in Videopost: the advanced Compositing and Visual FX utility in 3ds MAX. Actually nowadays people are not looking into that powerful section. But if you exploring Videopost, you’ll get some nice FX and options right in 3ds Max like Reverse Rendering.


Reverse Rendering

It’s a powerful process in 3ds Max with which we are rendering an animation reverse, that means 100 to 0, actually it is not possible any other 3d program directly.

  • Open the Video post window from Rendering>Video Post
  • Click the Add Scene Event Button in the Video Post Window
  • You will get a window like this, in that Uncheck the "Lock to Video Post Range" Checkbox and in the Scene range window, set your last frame as the Scene start and vice versa.
  • From the "Add Image output event" set a file name, format for your Rendering and Execute the sequence from the Video Post Window.
  • Enjoy the reverse Rendering.

Rain Fall Animation

Written by zelal


In this tutorial, we will make basic rain-fall animation against a matching background in 3dsmax. The final result would be as shown below:

Final rendered animation


Step 1
Have a look at what we will use for the rain. We will use “Spray” particle system to simulate such raining system which is located under Create > Geometry > Particle Systems.

Step 2
For now, just to have an idea click on Spray button and, in the Top viewport, drag to draw a rectangular spray icon.

Step 3
If you click the Play button, you will see how particles are emitting from the Spray source.

Step 4
OK, let’s delete it for now and then choose an environment image with which we will match the rain-fall. We could model an actual environment for this purpose, but since our main focus will be the rain itself we will use just an environment picture that shipped with 3dsmax (thanks to autodesk). Press ‘8’ in your keyboard to open the Environment dialogue box.

Step 5
Click on the button labeled “None”, then choose “Bitmap” in the Material/Map Browser window.

Step 6
Navigate to the “Backgrounds” folder under your 3dsmax’s root directory > Maps which is the default maps installation folder of your 3dsmax program.

Step 7
Now, highlight “LAKESIDE.JPG” and click Open button.
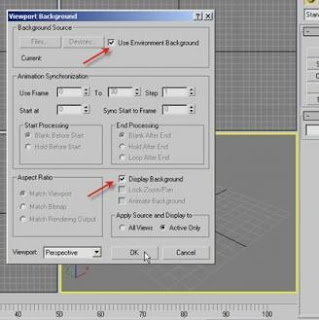
Step 8
Although the image has been set to be rendered as the background we will need to set it up as the Viewport Background as well to aid our scene arranging process. For that, activate the perspective viewport and press ‘ALT+B’ in the keyboard. Then check both “Use Environment Background” and “Display Backgrund”. Click OK.


Step 9
Now, you should see the Image in the Perspective view.


Step 10
At this stage, we should set up a camera to assign it to the Perspective viewpot. Choose Create > Cameras (Standard) > Target and then drag in the Top viewport to place a camera. Go to Perspective viewport and press ‘C’ in the keyboard t assign the camera to the view.

Step 11
While the Camera01 is still selected go to the Modify panel and check “Show Horizon”.

Step 12
Showing horizon will let you see a black horizontal line in the camera viewport which represents eye level. It will facilitate to adjust the camera. You may see another same looking line in the view before showing horizon. But that is grid line, not the horizon line.
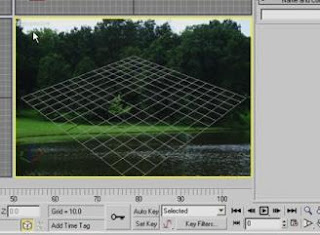
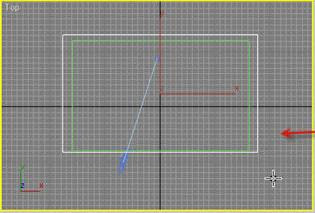
Step 13
Create a box in the Top viewport as shown. This box will be our water surface matched to that of the background image.


Step 14
Now maximize and adjust the Camera01 viewport (using Truck/Orbit/Dolly tools located at the lower-right navigation area) so that the water surface box is set with the background images’ water portion.


Step 15
Name the box as “water surface”. Then press ‘M’ in the keyboard to open the Material Editor.

Step 16
The first empty slot should be selected by default. We will now make a water material with this one. Set Specular Level = 102 (approx.) and Glossiness = 49 (approx.).

Step 17
Go down and expand the Maps roll-out. Then click the None button in the Bump slot. In the Material/Map browser window, choose Noise.

Step 18
In Noise Parameters, set the Size value = 5. It may be adjusted further later on while having a look on the rendered result for the water.
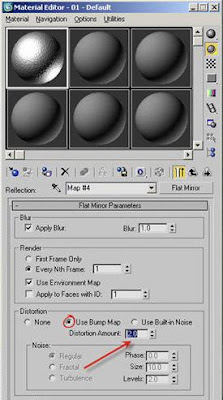
Step 19
Now, assign a Flat Mirror map to the Reflection map (just under the Bump slot). Flat Mirror is good enough as water kind reflection map.

Step 20
Under Distortion group, increase the Distortion Amount value to 2 To get enough noisy reflection. And to match the reflection with the Bump look choose “Use Bump Map” option.


Step 21
Our Water Material is ready. Apply this material to the water surface in the viewport.
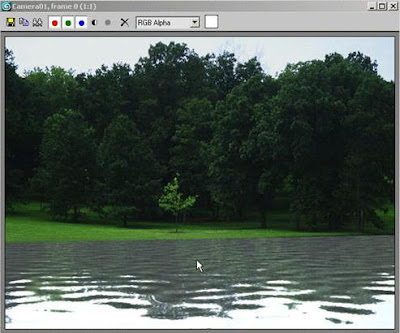
Step 22
Quick Render the Camera viewport to see the resulting water surface.


Step 23
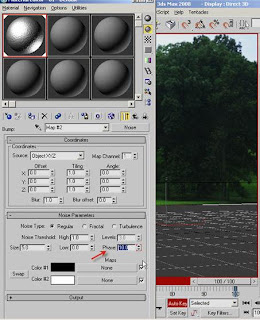
If you are not happy with the result, adjust the values in material editor. Also you can adjust the diffuse color. And if you are happy with the rendered image, let’s animate the water now. Turn ON the Auto Key and go to the last frame of the animation. In the Material Editor, set the Phase value = 10. You will not be able to see the resulted animated water until you render out the whole animation which you do later on.


Step 24
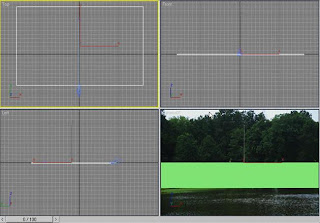
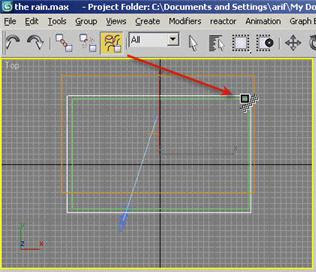
Now, for the Rain, create a Spray particle system in the top viewport covering at least the water surface as shown below.


Step 25
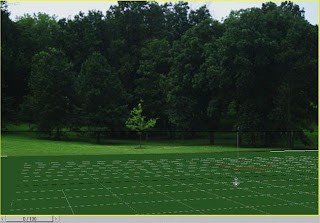
Using the Front viewport, position the Spray enough above the water surface. Also, rotate the Spray to simulate the natural rain-fall direction.
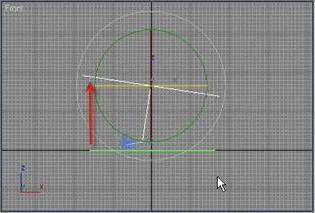

Step 26
If you play the animation you will perhaps understand that some adjustments are needed to achieve the rain-look in the Parameters area of the Spray.

Step 27
Go to the modifier panel and set the parameters of the Spray as
  • Viewport Count = 500
  • Render Count = 6000
  • Speed = 22
  • Timing Start = -100
  • Timing Life = 100
Step 28
Quick Render the camera view again. You will see a raw particle looking which obviously you did not expect for the rain-fall.


Step 29
We must apply a matching material to the spray which is representing the rain-drops. Open the Material Editor again and select the second empty material slot.

Step 30
Apply a pure White color (255, 255, 255) to the Diffuse color (since Ambient color is locked with the diffuse it should also be white as well). Set the Self-Illumination value to 100.

Step 31
Apply the material to the Spray and have a Quick Render. Still it is not a rain-like thing. We still need some adjustments for the object properties of spray itself.

Step 32
Select (if it is not already selected) and right-click on Spray01 and choose “Object Properties” (it may be “Properties” in the earlier versions of max).

Step 33
In the Object Properties window > Motion Blur group, choose the “Image” option and set the Multiplier value = 3.0 (a value of 2.0 may work fine). Click OK to exit the window.
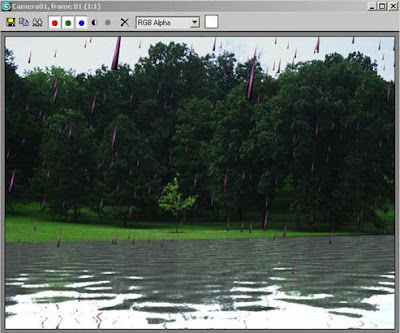
Step 34
Quick Render again. The appearance of the rain has been improved a lot. But we can do further adjustments in the parameters of Spray.

Step 35
While the Spray01 is still selected, go to modify panel again and set the Render Count = 8000 and Drop Size = 1.5. These values and other values may be played with later on when you practice.
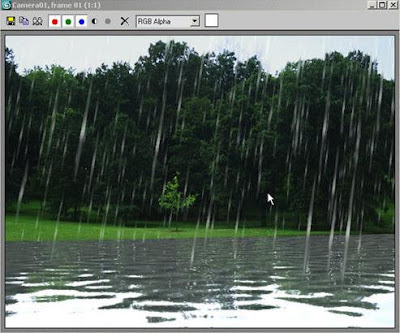
Step 36
Quick Render. You will see more improved result.


Step 37
But one important thing – if you notice the animation in the Left or Front viewport you will see that the rain is penetrating and thus passing through the water surface. We should not let it happen, rather we should make the raindrops be stopped by the surface and do a little bounce on the water surface.

Step 38
To do it, make a Deflector (Create > Space Warps > Deflectors > Deflector) aligned and matched to the water surface.

Step 39
Select the Spray01. Then enable the Bind to Space Warp button in the main toolbar and drag to the Deflector01 to bind the spray to the deflector.


Step 40
Play the animation in the Front or Left viewport. You will see that now rain is not passing through the surface. But the bounce is too high. We should lower it. We should also have some variations.

Step 41
Select the Deflector01 and go to its parameters in the modifier panel.
Set the Bounce = 0.02, Variation = 23, Chaos = 4.

Step 42
Quick Render to see the result. If you are happy you may like to render out the animation. Before, that you should save the file. Because, at the time of rendering the whole animation, if your computer becomes unstable for other reasons (windows problem etc.) or electricity goes OFF (which is a common problem in the non-developed country), you may get the file corrupted after re-opening it. So, this is a good and safe idea to save frequently the max file while working on.

Step 43
To render the animation, press ‘F10’ to open the Render Scene dialogue box.

Step 44
Either choose “Active Time Segment: 0 to 100” option or Range option with a specified range. Then go down and choose Save option with an .avi file for the output. Hit “Render” button and see the result after rendering of the whole sequence is finished.

Thursday, December 25, 2008

Creating a mirror with unlimited reflections

by Sushant Sudame


Before starting this tutorial, I assume that all the readers have a basic knowledge of 3dsmax.

Most of us know how to create a reflecting mirror in 3D max. It’s easy as apple pie. For those who do not know. The steps are here.
  1. Create a plane or a box or any geometry with flat surfaces.
  2. Open material editor and click on the diffuse spot of any empty slot.
  3. Select flat mirror form the new material library.
  4. Apply material to the geometry. (Plane is the best to choose.)
  5. Now, create any object in front of the geometry or the mirror.
  6. Add a light, preferably omni in the scene.
  7. Render. The reflection can be seen clear as a crystal!


For all those artists who have been through this, know its limitations. Flat mirror material cannot reflect its own reflection. Confused? Most of you must have been to a barber shop? What do you find? Two mirrors in front of each other, showing multiple reflections. Flat mirror fails in that way. Either you arrange the scene to cheat a bit or you use one mirror.


Setting up the scene with flat mirrors can be interesting but you cannot create an animation as they fail to reflect their own reflections.


To create a multiple reflection scene, what can be done? Before proceeding further, let me tell you that the people who have a low end system must follow the further steps at there own risk. Now let’s make the material and the scene.

Material:
  1. Select an empty slot.
  2. Change the Ambient and diffuse colour to black and specular to white.
  3. In maps, apply Raytrace to the reflection map with reflection value set to 100.
Scene:
  1. It’s a bit tricky. Create a frame for the glass.
  2. Now create a plane over the frame that is going to be used as the glass.
  3. Apply the material to the plane. ( You can also use a multi sub object material to create the complete assembly).
  4. Make a clone of the complete mirror setup and place it in front of the old one.
  5. Create any object between the two mirrors, let’s say, a teapot on a box.
  6. Adjust the camera angle to render.
  7. I placed a skylight with intensity 1.5 and light tracer left on. Even without any light in the scene, it is going to work.
  8. Render the scene.


This mirror is much superior in performance, over the flat mirror. The flat mirror can be only applied to the flat surfaces, but this mirror can be applied to any kind of geometry, even complex mesh objects such as automobiles, characters and even to NURBS objects. If you have noticed rivets or spoons, they have a kind of bloated reflection. The material will solve the issue of creating such reflection as well. So enjoy your new mirror and feel free to contact me for queries at sushant3dartist@gmail.com. Please critic this tutorial. Your suggestions are most welcome.

Join to us!

Ok, 2 years old post, edited now (2010-12.13).
I wanted to co-operate with fellows to build this blog together,
but now I lose hope...

Fast Randomise (Jiggle) with Maxscript

by Jamie T. Bentley
Thursday 17th Jan 2008


In this tutorial, with a basic shape, we're going to jiggle a hundred or so objects in under 30 seconds. This will utilise a very small piece of Max script which you can utilise to do any sort of randomisation you require.

Randomly changing orientation will not be covered, as it requires more than a single line (and thus, isn't "Fast").


Step 1 - Select the objects to Jiggle
I've made a ground plane and a rock object. I've instanced the rock object 99 times so there are 100 rocks. What we're going to do is offset them within a tolerance on the X and Y axis, then scale them randomly as well. The application of this can be anything, asteroids, leaves, rain drops, whatever floats your boat.

If you don't have any rocks, make some teapots or sphere's.


Step 2 - Using Scripting
In the bottom left of Max (by default) is where you can quickly enter Maxscript commands. Now, simply putting in a move command will obviously move the selection in a uniform manner.

We're going to move each object individually by performing the same task 100 times (well, as many times as you have objects).

The syntax of what I want to do is quite simple.
for i in selection do move i [x,y,z]

for i in selection --- Run this loop as many times as there are objects in my selection
do move i --- move object i
[x,y,z] --- The affected coordinates

random 30.0 0 --- this is the random function.
Its syntax is "Random "

So, I'm going to jiggle the rocks 25 units on the X and Y axis with the following...

for i in selection do move i [random 25 0, random 25 0, 0]

This moves the objects up to 25 on the X and Y axis. Z has been left as 0.

Now we'll do the same thing for scale... Since I have used rocks, my pivot is at ground level, not in the centre. Also, I am only scaling on the Z axis to flatten my rocks out.

for i in selection do scale i [1,1,random 1.1 0.1]

So there we have it. A simple and quick way to jiggle scale and movement of objects.

Underneath is the same thing but cloned and done again, and again.

Autodesk 3ds Max 2009


Publisher: Autodesk Inc


Description

Our 3ds Max 2009 software delivers new view port technology and optimizations that result in vastly improved interactivity of even the largest, most complex scenes. It can create rich and complex design visualization, generate realistic characters for a top-selling game and bring 3D effects to the big screen as well.

Autodesk 3ds Max 2009 3D modeling, animation, and rendering software supports visualization professionals, game developers, and visual effects artists to maximize their productivity by streamlining the process of working with complex scenes.

Common tasks and operations-selection, material assignment, transform, grouping, cloning, and many more-are now significantly faster, making 3ds Max 2009 the most streamlined version of the software ever. In addition, a new Scene Explorer makes the management of large scenes-and interacting with hundreds or even thousands of objects-far more intuitive.

Produce stunning photo-real imagery, faster. With the release of 3ds Max 2008, Autodesk unveils Review. This powerful new tool set supports iterative rendering work flows by delivering interactive previewing of shadows, the 3ds Max sun/sky environment, and mental ray Architectural and Design material settings. Based on the latest game engine technology, Review gives you the instant visual feedback you need to iterate rapidly.

Quickly extend 3ds Max or streamline multi-application workflows. The new MAXScript ProEditor provides you with an intuitive interface for working with MAXScript that will streamline the scripting workflow, making it easier to author scripts that automate and customize 3ds Max. Deeper support for the DWG and FBX file formats results in faster, more accurate importing of data from other popular Autodesk applications; plus, new features facilitate working with this imported data.

Enjoy a less menu-dependent modeling experience. 3ds Max 2009 gives you a more streamlined, artist-friendly modeling workflow through a collection of hands-on modeling UI options that let you focus more on the creative process.


Major Features:
  • 3ds Max User Interface
  • Data and Scene Management Tools
  • Modeling
  • Polygon Modeling and Texturing
  • Spline/Extended Spline and NURBS Modeling
  • General Animation
  • Character Animation
  • Modifiers
  • Space Warps- Dynamics
  • Cloth
  • Particles
  • Multiple Rendering Options
  • Rendering Controls and Effects
  • Hair and Fur System
  • MAXScripts
  • 3ds Max API/SDK
  • Connectivity and Integration

Minimum System System Requirements:

For 3ds Max 2009 32-bit version:
- Intel Pentium IV or AMD Athlon XP or higher processor
- 512 MB RAM (1 GB recommended)
- 500 MB swap space (2 GB recommended)
- Hardware-accelerated OpenGL and Direct3D supported
- Microsoft Windows-compliant pointing device (optimized for Microsoft IntelliMouse)
- DVD-ROM drive

Note: Apple computers based on Intel processors and running Microsoft operating systems are not currently supported.

For 3ds Max 2009 64-bit version:
- Intel EM64T, AMD Athlon 64 or higher, AMD Opteron processor
- 1 GB RAM (4 GB recommended)
- 500 MB swap space (2 GB recommended)
- Hardware-accelerated OpenGL and Direct3D supported
- Microsoft Windows-compliant pointing device (optimized IntelliMouse)
- DVD-ROM drive

Software System Requirements:

1. Internet Explorer 6.0 or higher
2. DirectX 9.0c

Wednesday, December 24, 2008

Merry Christmas and Welcome

Merry Christmas to all ! :) and ...

... Welcome folks to my first blog.
If God willing, i wish to build a good pleace for people who want to learn Autodesk 3DStudio Max . Post all what we need about -- tutorials, guides, tip and tricks, resources links, et.c. Well, that's the idea. Let's see what happens :)
Also i wish to do team work, so if you want to support the team check up here.

Thanks