if (test_roll != undefined) do
 if (test_roll.isdisplayed) do
  (destroyDialog test_roll)

rollout test_roll "testUI"
(
 fn objSelFilter obj = (superClassOf obj == geometryClass)
 label showme "" align:#left pos:[10, 10]
 pickbutton pbt_selObj "Select. objet" autoDisplay:true \
 pos:[10, 40] width:80 filter:objSelFilter

 on pbt_selObj picked obj do
 (
  if obj != undefined do
  (
   result = (At time (currentTime+1) obj.pos.x) \
   - (At time currentTime obj.pos.x)
   showme.text = result as string
  )
 )
)

createDialog test_roll 150 80
Friday, August 28, 2009
Display data in UI rollout
Today I found a question in the forum on the display of data in scripted UI rollout instead of print to Listener. This new to maxscript user just try some complicated and roundabout way but but this is normal in early. He want to display distance between next and previous frame and ask how to do that in scripted rollout. The answer is sample, just need to add UI controller that will display needed data. It can be edittextbox if we want to copy the result, or just a label controll. What is important here is that we need to convert our data to string. That's all. And there is an short example that I post to help:
Thursday, August 27, 2009
Bubbles

This is some old tutorial mades 2002 but it's a short and simple and come with complete .MAX scene file, also all textures included. You can find it for free on TurboSquid.com.
Monday, August 24, 2009
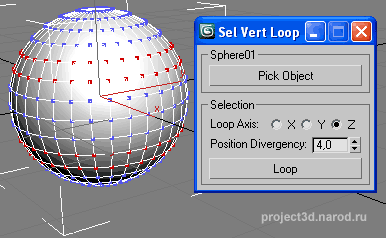
Select Vertex Loop 1.1
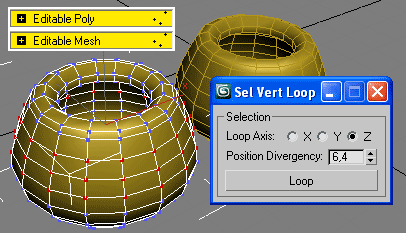
Extend 3ds Max selection features on Editable Mesh and Editable Poly.
Following comments in the ScriptSpot forum on my script Select Vertex Loop which I published there on 21 August, I decided to add any additional notes. And finally today I updated the script also to support object set, ie to works on selection of objects. Maybe this upgrade is a bit strange for me, but why not then someone finds this useful, right?
For more details and downloads the new version 1.1 (also and previous version 1.0) read my post on ScriptSpot.
Also you can see demo video out there or here are links to:
- YouTube video: http://www.youtube.com/watch?v=UWNGp1qJu0Q
- Yandex mirror: http://video.yandex.ru/users/project3d/view/44/
- Or get XviD copy from my home page: http://project3d.narod.ru/maxscripts.htm
Simultaneous Twist Bones and Stretchy Limbs
Mathieson Facer tutorial follow up Paul Neale IK/FK Arm video tutorial and Twist Bones video tutorial and extend the rig system to support stretchy limbs and twist bones in the same rig.
Note:
Tutorial used Jason Labbe's Stretchy Bones Tool (MaxScript) to create stretchy bones, but... this script is no more available for downloads there :(
Twist Bones
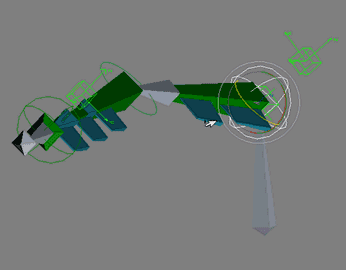
This Paul Neale tutorial explains the process of creating twist bones for an IK/FK blending arm system.
IK/FK Arm
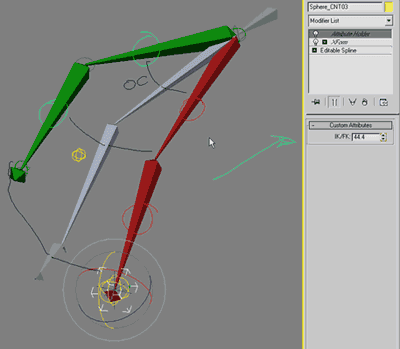
Paul Neale tutorial explains the process of creating an IK FK blending arm rig. There is also a follow up tutorial that covers the creation of twist bones using the expose transform helper.
Understanding Caustics

As the author said:
"This purpose of this lesson is to provide a very simplified explanation of caustics ..."
Read more here
Sunday, August 23, 2009

Spherical Spline
I accidentally found Dave Stewart site where he offers some scripts. Cleary seen so he has long experience with MaxScript, but personally I do not recommend him codes to script beginners, because they require a lot of debugging. but there are interesting ideas inside, Spherical Spline for example.
Friday, August 21, 2009
Reactor Convex and Concave objects
 Reactor classifies objects into two types: convex and concave. This affects the way bodies collide with other bodies, and the accuracy of the simulation. In every Reactor help reference that shipped with Max have a good exploration what often skiped from users. Also in most web tutorials covering Reactor not sensibly illustration where and why used conver or concave type. But this is important base part to get started that not recommendable to skiped. So here I'll just quote from Reactor reference one comparatively short and good exploration of the essence of this 2 base types:
An object is defined as convex if, given any two points inside the object, you can always go in a straight line from one to the other without going out of the object. Convex objects include spheres, cylinders, and boxes. If an object is not convex, then it must be concave. Concave objects include teapots and (most) landscapes/terrains and rooms.Generally, convex objects are faster to simulate than concave objects. Because of this, you should aim to use convex objects as often as possible for simulation. reactor enables you to treat concave objects as convex so that you can take advantage of their faster processing time. However, there are also cases where it is appropriate to treat a convex object as concave. In reactor convex objects have an "inside" which determines when objects are contained within one another, but concave objects do not, and so an object entirely within a concave object will not be considered as interpenetrating with that object. You cannot place objects inside a convex object. Instead, you must define an object as concave in order to place objects within it. For example, if you were animating a room, you could design it as a box and treat it as concave, so that you could place objects within it.
Select Vertex Loop
Extend 3ds Max selection features on Editable Mesh and Editable Poly.
Read more about my new MAXScript and downloads it here.
Thursday, August 20, 2009

Wednesday, August 19, 2009
My MAXScripts RSS

At the beginning of August I opens a page on my site for my last MAXScripts, also RSS feed. What I forgot is to add the news here :) Now I add this 2 links in my Perosnal Links section (at the end of the left blog menu).
Hump Modifier

Hump is a simpleMod scripted plug-in modifier which folding an object according to the transformation of the modifier's gizmo, the amount and heaping parameters over X, Y or Z axis.
Actually this is my first plugins online :)
I wrote himself and others but still test them for defects.
If you want to test it, just drop the script to Max viewport. And if you want to install it then copy the script to your 3ds Max "stdplugs\stdscripts\" folder.
The script you can find here.
Tuesday, August 18, 2009
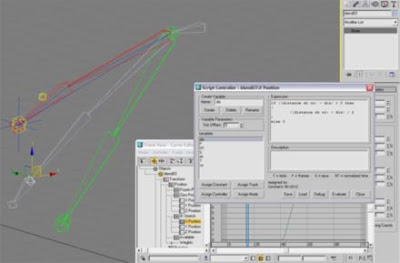
Wiring Tricks
I just found an interesting question in the forum:
I have wired visibility from Box06 to Point01 that has an attribute holder or "Param1" which has spinner integer with value ranging from 0 to 15. Now I want Box06 visibility only to to be 1.0 when Param1 value is at 6, otherwise if its on 2, 4, 1, 12, or whatever in that range other than 6 then Box01 visibility is at 0.0 value. What should I write in the expression after I have wired these two. Or are there any other ways to go around this?
Well,... If looking for another way, you can use
Boolean with checkbox instead of spinner controll.
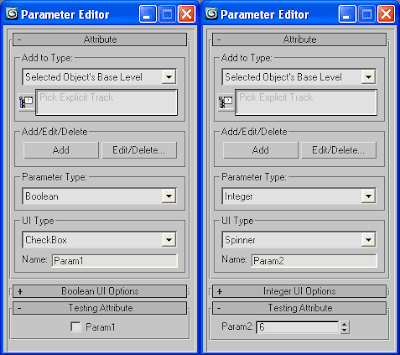
Then if checked visibility will be 1 and 0 if uncheked.
In this case do not need to write any expression.

But if you get value 6 from other event or script
and need to wire by spinner, then write:
if Param2 == 6 then 0 else 1
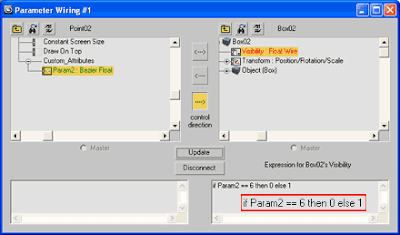
(in the screenshot I zoomed a little expression to see more clearly)
Load AutoBackup File v.2
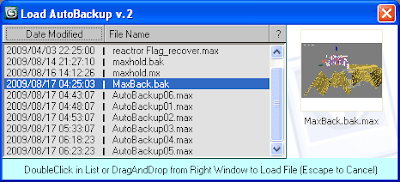
I update my last MAXScript or more accurately speaking, it got a version 2. The idea was to add thumbnail support, but there is no way to add thumbnails in 3ds Max versions below 2010 but ... instead of adding thumbnail support I just add browser dotNet control, which has its advantages, like access to the Windows context menu, but most important of them in this case is the Drag-N-Drop options.
The script is open source so you can see the trick inside. Speaking briefly, it creates a "temp" folder into Max "autoback" folder and temporary copy selected in List file there. And dont worry, never more than one file there, also the last is deleted when the dialog closes.
I'm not well familiar with dotNet so I dont found a way to set the browser in thumbnails view mod automatically, but what I found is quite interesting, 1st: settings in Windows Explorer and dotNet browser controll are not related, and 2nd: dotNet settings is keeped somewere, because they are valid and in next Max sessions and even after a restart Windows.
So, all you need to do is to set thumbnails view mod once (on first start)*.
[*] For more details see the video.
The script still has the option to install as macros (MacroScript),
and it's still compatible with 3ds Max 9 and higher.
I'll keep the previous version 1 for those who don't need this innovation.
If YouTube video is not so clear, here is a mirror XviD version (1 mb):
http://project3d.narod.ru/xvid/load_autobackup_xvid.avi
Read more:
http://www.scriptspot.com/3ds-max/load-autobackup-file
Download .MS:
http://www.scriptspot.com/files/u9133/LoadAutoBackup_v2.ms
Saturday, August 15, 2009
Snapshot To Shape [updated]
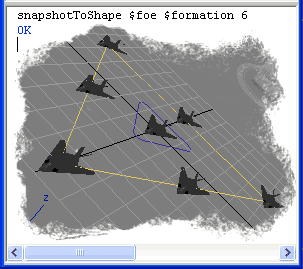
Obviously I was a little distracted ... LoL ... I discovered that I forgot something in the help usage string in my Snapshot To Shape MaxScript that I posted recently. Well, nothing serious, but better would be if everything is okay, right? So the bug fixed. I also optimized both functions, so now the script run more faster :) There is the link to the new version 1.D (Debugged).
Load AutoBackup File
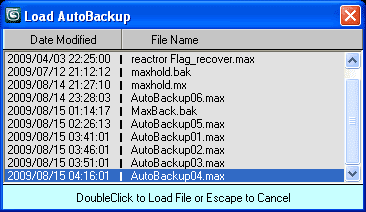 Inspired by Jordan Walsh script AutoBack File Loader Zorb to make an autoback file loader with option to sort by date modified (and comments about this script), I just wrote my version. Of course, Jordan script support thumbnail, I guess that is a Max 2010 or .NET (or both) feature.
- My code is simple, not necessary and does not use .NET;
- Also offers an option to sort by name and date modified;
- Check for save current file before load new one;
- Convert system time format from AM/PM in 24h;
- The dialog is modal, to use it or close it (to stay open is not desirable);
- Works quickly and is compatible with 3ds Max 9 and higher;
- Can be installed as a MacroScript (optional);
You can read more in the ScriptSpot and downloads the MaxScript from there or from here.
Friday, August 14, 2009
How to Create a Video Game Dumpster
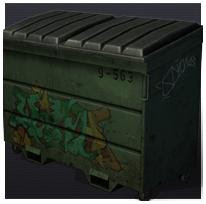 How to Create a Video Game Dumpster:
 The Complete Current-Gen Workflow
by Kaleb Aylsworth
This mammoth video training series features over 194 minutes of video instruction on all aspects of game art creation, including creating the low-poly and high-poly models, the UVW unwrap, baking normal maps from high-poly, and creating diffuse, specular and detail bump textures.
Contents
- Creating the Low-Poly Model
- Creating the High-Poly Model
- UVW Unwrap
- Baking Normal Maps From High-Poly
- Creating the Diffuse Texture
- Creating the Specular Texture & Detail Bump Texture
Wednesday, August 12, 2009
Snapshot To Shape
Snapshot To Shape is a my new MaxScript online.
Instead of rewriting my description you can read all details here.
The YouTube video is too blurred and unclear,
so you can get here XviD version (2 mb):
http://project3d.narod.ru/xvid/snapshot_2_shape_xvid.avi
[Download the script]
Flipper Mechanism
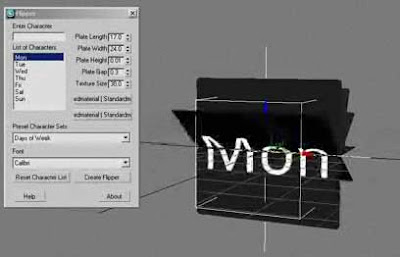
Flipper Mechanism is a MAXScript by Arda Kutlu written for 3ds Max 2008 that creates a rigged flipper mechanism with all textures and materials. With this script you can easily do old style airport flipping boards, flipping clock, signs, etc.
The script is still in beta stage, I have not tested it, as the author says, Use at your own risk. So read the usage notes first in the ScriptSpot forum. Also there is a demo video attached. Download MAXScript here.
Monday, August 10, 2009
Ball Rigging
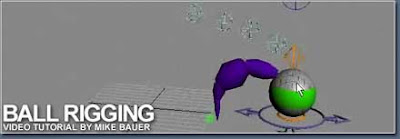
This video tutorial by Mike Bauer sounds good. It's looks complex tutorial about rigging because covered many aspects. I'll post it here to remind me to check it out when I get around to it.
Introduction:
Learn how to create a simple rig that will help you explore the complexity of animating a ball. Everyone should to start their animation experience animating a ball, and this rig will give you some cool tools to make your animation life easier. Topics include MaxScripting, Reaction manager and more. You'll never look at animating a ball the same way again!
Download Video Tutorial:
Part 1: Duration: 30 minutes 11 seconds - File Size: 147 mb
http://www.3dtotal.com//team/Tutorials_3/ball_rigging/Stretchy_1.zip
Part 2: Duration: 18 minutes 56 seconds - File Size: 91.8 mb
http://www.3dtotal.com//team/Tutorials_3/ball_rigging/Controls_2.zip
Part 3: Duration: 32 minutes 58 seconds - File Size: 164 mb
http://www.3dtotal.com//team/Tutorials_3/ball_rigging/Tail_3.zip
Part 4: Duration: 51 minutes 36 seconds - File Size: 233 mb
http://www.3dtotal.com//team/Tutorials_3/ball_rigging/Scripting_4.zip
The home page of Mike Bauer also offers free resources and many video tutorials, so I recommend this site to see (http://www.bauervision.com).
P.S. -- I also find on the Mike's site a .MAX scene for this tutorial:
http://www.bauervision.com/DN_loads/BallRig.zip
Lottery machine with Reactor
 There is "Creating a lottery machine with 3D Max and Reactor" tutorial written by Richard. That I don't like at this site (3dsMaxResources.com) is that always need to login. Every tutorial up here is chopped on many pages. Also this one is spread out on 15 pages. And all their tutorials start with some setup modeling part into first 3-4 pages, and even before the real useful part jump login form... and I'm not read their site often so usually I forget my password and need to register again. But never mind.
About the 80% of tutorial itself cover setup modeling technics and I surprise how this guys who post out there always find most harder method to modeling whatever :) About the Reactor part in this tutorial, it's just simple Riggid body simulation, and all wath can be learn here is only to avoid intersection in Reactor setup. But I see here 4 intersecting objects and even 3 of them not needed to simulation. Personally for me this tutorial was a complete waste of time :/
Change Material per frame
First, must say that I like a most essential tutorials which help us to understand better how Max works. "How To" tips are more prefered by many folks, yes, I know that, but a little bit theory, even in seemingly simple tasks are more useful. So I can only hope that my tutorials also have been useful for someone.

But now the issue.
As far as I remember, I have already written about this case. But as I see, not everybody knows how to do that. I read a forum post where people seek for a test render method which will render to say for example 15 frames with 15 different material applyed on some object. Well, even in this case must be animated object materials. What's that I see so they try to assign new material on every frame by MaxScript, but probably you guess, the final render will get only last assigned material for all frame range. This is obtained because assigning material to scene object is a similar to creating new object. Lets to say, for example, we want to clone some object on every frame:
for t=1 to 15 do (at time t animate on (copy $obj01))
Well, we have 15 new copies created but no animation, right? If the aim is to appear them 1 by 1 then we need to animate their visibility. The materials case is similar. So the next code will NOT work:
for t=1 to 15 do (
at time t animate on
($obj01.material = meditMaterials[t])
)
In Max exist scripting method called "Change object properties at render time" , but this is the hard way and also will slow the rendering process. And why we to do this as there is a much easier way :) Just made MultiSubObj material, assign it to our object, apply Material Modifier to the object and just animate it ID's. That's all.
Sunday, August 9, 2009
Get Material from file
 I'm not stop to wonder of the people who write scripts for anything ... Perhaps most of them just want to boast that they "can do" something. Here an example of this, "Copy/Paste Material to File", interesting name for a funny script. It install 2 MacroScripts in 2 separately Max applications, only to save and load .MAT file. But hey, we can do that in sec without scripting, right? And even without saving .MAT file to disk. Yes, you can directly get material from other .MAX file through Material Browser and the .MAX file can be still open in different Max shell. See the picture.
The idea for his script was inspired by "Copy/Paste Obects v0.2", another useless script. What's it doing? Save selected object(s) to .MAX file and "load" (ie merge) it in another. Also 2 MacroScripts needed for somthing that, how to say... :LOL:
Friday, August 7, 2009
Motiva SOAP beta
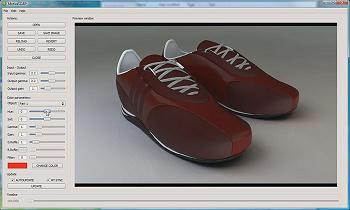 Motiva is a young cg company with bold ambitions but released recently just one beta product - SOAP. Now of their site you can find also 4 maxscripts in the beta stage. They are all encrypted and nothing special. I would not personally tested them. In the forums online you can find similar scripts, with an open source (!), ie you can read the code to learn, modify them for your needs and finaly debug 'em if necessary. And what about SOAP beta? Realtime postproduction tool, okey, but ... Maybe I missed something, but which is the special feature here? Every Photoshop filter has realtime preview, and if we talk about Max integration then ... heh, every Render Effect has realtime preview with on/off or manual update. Well, maybe the new Motiva feature is only the resolution size of the preview, but as they say, their product is slow on multiframe. And this is what I think, it's premature to draw attention to their first beta product right now, just wish them luck :) And ... if you decide to test it SOAP then note required software.
Here is Motivia downloads page
Hierarchy selection
Currently I working on the scripts associated with various operations over hierarchical structures and what I can say is that is a real challenge :) For example, cloning hierarchy is done well then made by Max Clone tool or holding Shift key while Move, Rotate or Scale it, but what happens when you have to do it by MAXScript? Yes, sometimes requiring MAXScript, in scripted controllers for example. In this cases the result is broken hierarchy. And this is only one example (about copies), but cases are in fact a lot.
Now I'll only mention the issue of selection of hierarchies. It's useful to know that there are hot-keys for this purpose. With PageUp and PageDown we can loop in selected object hierarchy Up and Down at it levels. Ctrl + PageDown select whole objects in the tree, and this also can be done by double left mouse click over object.
In MAXScript hierarchy tree present similar to the directories tree. For example, if we have to say a box with name "Box01" and link to it as child other box ("Box02"), then the full tree will be just: $Box01/$Box02 . Well, to select all children on that box will be easy, but if the tree is too large there is "shortcut":
select $Box01/.../*
-- or
select $Box01...*
They are the same, the both work full uniform. Slight complication occurs, however, in converting the scene object to "$Box01", ie cannot just select our box and enter:
select $...*
because this code will select all scene objects. So old decision of this case was execute string:
select (execute ("$" + $.name + "...*"))
That's cool, but works slow and as I said, its old coding style.
There is in practical and fast way to select:
for i in selection do selectMore i.children
Also by this way we can work on multiple hierarchy at once.
Here seems easy, right? This is just the beginning :)
Wednesday, August 5, 2009
Spring Link
SpringLink is a MacroScript by Borislav Petrov (Bobo) writen for MAX 3 (12/29/1999) who lets you link a hierarchy of objects together using a Flex-driven Springs.
Read more and download the MaxScript here:
http://www.scriptspot.com/bobo/mxs3/springlink/
Read more and download the MaxScript here:
http://www.scriptspot.com/bobo/mxs3/springlink/
Rendering Mattes

Good introduction tutorial about Rendering Mattes by Matt Richardson & Cary Ng
Mattes are used to aid in the isolation and selection of specific areas of an image for post-processing in a paint or compositing package. The term matte describes a template one uses to delineate an area, similar to how artists use molds to mark an impression to be manipulated. In Photoshop, any grayscale image loaded as an alpha channel or a clipping mask can be used as a matte, ready to be color-corrected. 3ds Max offers the flexibility to create mattes associated with 3D, such as Alpha, Object & Material ID, and Z-depth. It also offers the ability to create more specialized mattes such as RGB mattes, Normals, RawTotalLighting, and other Custom mattes that target specific areas to be adjusted in post-production.
Material name in MAXScript
Well, again something about MAXScript. A ScriptSpot user stick on object material name. He just wanted to print in Max Listener the list of selected objects with their material name. You know, objects always has names but their material is optional, so shortly, when we work with object materials is not only important, even binding to check if they has material applyed/assigned.
Also in the forum topic, the user ask for help on how to sort the list by 2 ways - ObjectName + ObjectMaterial and ObjectMaterial + ObjectName. For this task can be tested many ways, dependent on that method we prefer to collect and print the list. If someone interesting about current script, there it is:
Also in the forum topic, the user ask for help on how to sort the list by 2 ways - ObjectName + ObjectMaterial and ObjectMaterial + ObjectName. For this task can be tested many ways, dependent on that method we prefer to collect and print the list. If someone interesting about current script, there it is:
 ---------------------------------------
sel = selection as array
arrObjMtl = #()
arrMtlObj = #()
for i in sel do
(
   if i.material != undefined then (
      append arrObjMtl (i.name + " :: " + i.material.name)
      append arrMtlObj (i.material.name + " :: " + i.name)
   )
   else (
      append arrObjMtl (i.name + " :: " + "--")
      append arrMtlObj ("--" + " :: " + i.name)
   )
)
sort arrObjMtl ; sort arrMtlObj
for i in arrObjMtl do print i
for i in arrMtlObj do print i
 ---------------------------------------
Tuesday, August 4, 2009
MAXScript VerletClothSim
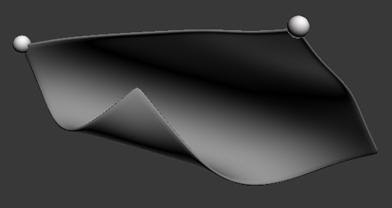 Inspired by Skeel Keng-Siang Lee's tutorial on soft body physics and for the sake of learning, Markus Boos wrote a MAXScript that can simulate cloth. It is pretty much hacked together, basic and very limited, meaning there is no UI, you have to know what you are doing and there is no collision detection. It is pretty slow too but it was more for looking into new algorithms than using it for actual production. Who knows, maybe it will evolve into something better and a more universal thing for little simulations in character / vehicle rigs etc.
There is a preview on youtube:
http://www.youtube.com/watch?v=V30Tygl-hxE
In case anyone wants to check it out, Markus uploaded the script and max files (2010) here:
http://www.scriptspot.com/3ds-max/maxscript-cloth-simulator
NOTE: Version Requirement: 3DS MAX 2010
Monday, August 3, 2009
Materials Shift 1.1
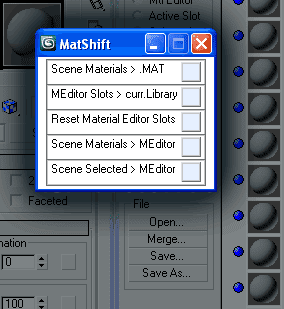
Okay, i update my MatShift script (posted here) adding button that put to Material Editor slots materials from selected scene objects. The scratch idea (snippet code) for this action i post in preview post here. So... there is the link to get the new version 1.1 .
Put Selected to MEditor Slots
2 days ago i just wrote a script to shift materials between Scene, Material Editor slots and current Library. But i think so i miss something :) so i post today here 2 maxscripts that put materials from selected scene objects to Material Editor. The difference between this 2 versions is only in slots ordering. In first version they will be appended started from 1st MEditor Slot and in second version they will be appended starting from current active MEditor Slot, that i think is more useful.
-- add Materials from Selected objects to MEditor slots
---------------------------------------------------------------
-- [V.1] - starting from 1st MEditor Slot
(
  local sel = selection as array
  if sel.count == 0 then
    messageBox "Nothing selected!" title:"Selection"
  else
  (
    mtl = #()
    for i in sel where i.material != undefined do
      appendIfUnique mtl i.material
    if mtl.count > 0 do -- if there materials
    (
      if mtl.count > 24 do -- if they are > 24
        mtl.count = 24 -- keep 24 of them
      for m in 1 to mtl.count do
        meditMaterials[m] = mtl[m]
    )
  )
)
-- [V.2] - starting from current Active MEditor Slot
(
  local sel = selection as array
  if sel.count == 0 then
    messageBox "Nothing selected!" title:"Selection"
  else
  (
    mtl = #()
    for i in sel where i.material != undefined do
      appendIfUnique mtl i.material
    ams = activeMeditSlot
    if mtl.count > 0 do
    (
      freeSlots = 25 - ams
      if mtl.count > freeSlots do
        mtl.count = freeSlots
      for m in 0 to mtl.count-1 do
        meditMaterials[ams+m] = mtl[1+m]
    )
  )
) -- end
Sunday, August 2, 2009
timeStamp()
I think MaxScripters know about timeStamp() function in Max. It gives time-of-day in milliseconds and is useful in time calculations. For example if we need to check rendering time:
start = timeStamp()
render()
end = timeStamp()
format "Processing: % seconds\n" ((end - start) / 1000.0)
Also timeStamp() is useful in scripts testing where we need to compare the speed of execution of different expressions with the same result.
start = timeStamp()
render()
end = timeStamp()
format "Processing: % seconds\n" ((end - start) / 1000.0)
Also timeStamp() is useful in scripts testing where we need to compare the speed of execution of different expressions with the same result.
Saturday, August 1, 2009

Subscribe to:
Posts (Atom)


