Animate an Iceberg Turning into a Desert Island Video tutorial by Evan Schaible. Dreamscape plugin requered.
Description: In this hour long video tutorial, we will follow the complete process of animating a 3d iceberg as it transforms into a desert island. We will take an in-depth look at using the many complex features of dreamscape, in conjunction with hand painted displacement maps and animated the meshes, and even go over some of the more classic principles of animation.
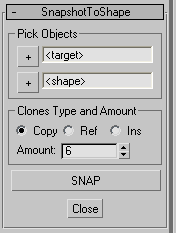
This is new requested UI version (v.1.E) update for my Snapshot To Shape script. Utility interface added, so now you can pick or enter object and shape names, choose copy type and amount via UI.
Ok, to clarify what I said in previous post, will sketch a brief example to compare Grayson Chalmers rigs method with built Max constraints. I'll do this just to be sure so someone dont say I'm not right. Maybe Grayson think so he has discovered new and creative methods? The truth is that Max has a suitable controllers for the cases covered in him video tutorial.
So there is my example (see the video for final result). Here I use Link Constraint for the ball (sphere) and 12 surrounding rods (Line shapes) for its targets. Also LookAt Constraint for the arrow object (Line shape) and ball as its target. So you can finish this simple example - modeling plus animation for less then 5 minutes, and here no rigging or special setup needed. Well, only to setup the animation using Grayson rigs will take an hour or more.
So, let for convenience, world center [0,0,0] to be the center for our "clock" device. Create Line with 2 knots with length = 20. Be sure it pivot is centered. Move it +60 by Y, ie to position [0,60,0]. Slide to frame 30, turn on Animation, and rotate it 180 degrees, and turn of AutoKey. I do this with the thought that we work of 30 frames per second.
Now you can create a Dummy or Point helper in the world center [0,0,0] to use it as rotation axis, and make new 11 independent copies (ie Clone type Copy) by using Angle snap tool. They must by 360 / 12 = 30, ie in 30 degrees. Also can do the same by next script:
for i=1 to 11 do (c = copy $; about [0,0,0] rotate c (i*30) z_axis)
What's next?... We need to move the keys for each spline object (rods). Select Line02, select its 2 keys end move them by 30 forward, so now it animation start from frame 30 (where Line01 animation ends) and end in frame 60. Select Line03 end move its keys 2 * 30 = 60 , end so on for all of the 12 objects. if you wish to speed up this procces by script:
select $*Line* -- select all splines all = selection as array -- collect 'em for i=2 to all.count do (moveKeys all[i].rotation.controller ((i-1)*30))
Now create a shpere with radius 5 and move it to [-16,60,0]. Go to frame 0 and from Animation menu add Link Constraint to it and pick Line01 as first target. Go to frame 30 and pick Line02, and so on, repeat this for all slidding by 30. Immportant: if you add new target at the same time (forget to move time slider), it will overwrite last existing target. So, as you see, even 12 targets in this case - whole task take a seconds.
Finally create another Line for arrow object. Align its first knot to [0,0,0], also and it pivot to [0,0,0]. move it second knot to [37,0,0]. Length more than 37 will intersect with the sphere. While "arrow" still selected, from Animation menu add LookAt Constraint and pick the sphere. This task also done. Play the animation.
I shall be quite pleased when I saw new video session published on Area Autodesk site, still does not happen very often, especially when it comes to animation, also to learn from practitioners is the best choice (at least so it should be the best choice).
The full article name: GDC MasterClass: Layers of Control: Animation controllers, constraints, and layers in 3ds Max
Judging by the rank and experience of the lecturer (Grayson Chalmers – Outsource Manager for Sony Online Entertainment Austin), it should be an awesome video tutorial, major and essential for animators, right? But its not, and I'm disappointed.
The "core" of the tutor is about animating weights of position and orientation constraint, and setup some simple rig system which is just to show us how flexible is to work with custom attributes. Ok, good to know, but the final usage of this rig system is too complicated. Yep, even in Max R4 has methods which is more quick and easy to setup, more flexible and better contrloled, which ultimately produced better final result.
So what going on here? Whether the level today is really fallen very low?
Batch Loader is my last script designed to quick Merge/Import multiple files. I noticed that there is interest in scripts like "Batch Merge". I also read the comments and requests at ScriptSpot.com, so here's what I created.
Features
Merge multiple .MAX files
Import multiple .* files (ie all that can be imported)!
Log all files where failed to load to Listener (if any)
Multiple history for recent used paths available
Limit count of recent paths to keep in history added
Group option available
"Auto" option (if is checked no prompt for Merge/Import) *
Dialog window is resizeable
[*] If "Auto" is unchecked then default Max Merge/Import dialog appear for each file. It is slower alternative, but it is important and useful in some cases.
Read more and download the script as usually here.




 Posts
Posts


