Sunday, June 28, 2009
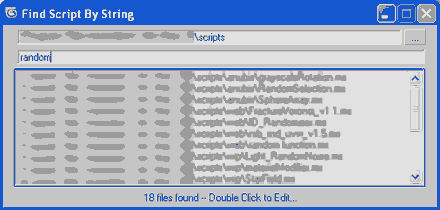
Find Script By String
Recursive search in selected directory for string inside .ms scripts and finally double click on item in list of matches result to load the script for editing.
[ScriptSpot post] [Download link]
Categories:
MAXScript
Line Per Vertex
Line Per Vertex is a maxscript by Garp to creates lines out of an object's vertices.
Friday, June 26, 2009
Bounding Sphere
All we know about Bounding Box in 3ds Max, but what about Bounding Sphere? Yep, there no mapped function for that purpose and the problem is interesting and discussed by game developers in GameDev, also by scripters in ScriptSpot. And as you guess, ScriptSpot's thread interested me. I know so always there exist "shortcut", so now after being free from my duty, I sat down to think for a short, clean and optimized code. You can see my short simple version out there or right here:
obj = selection[1] -- select EPoly or add EPoly_mod
allVerts = for i in 1 to obj.numVerts collect polyop.getVert obj i
vDist = for i in allVerts collect distance i obj.center
sort vDist
-- Optional step:
-- if obj is not EPoly and you wish to restore it then remove EPloly_mod
bs_radius = vDist[vDist.count] -- BSphere Radius
bs_pos = obj.center -- BSphere Center
That's all. Now you can test it on some object and also may try make a sphere in the view port:
s = sphere pos:bs_pos radius:bs_radius xray:on
Fading undo with Morpher
Fading undo with Morpher modifier by Sergey Pogosyan.
Description: Photoshop has excellent command Fade, with help of this command you can alter the amount of last applied filter. Similar functionality gives you Morper modifier in 3dsmax.
Read all tips-n-tricks article here.
Description: Photoshop has excellent command Fade, with help of this command you can alter the amount of last applied filter. Similar functionality gives you Morper modifier in 3dsmax.
Read all tips-n-tricks article here.
Categories:
Modeling,
Tip n Tricks
Wednesday, June 24, 2009
Monday, June 22, 2009
Sprite Buffer
Such a Maya feature to compare rendered images. Result displayed into VFB. Which means that you have ZoomIn/ZoomOut control (which is useful in comparing bitmaps) and also access to all VFB's controls like: Save, Copy, Clone, RGBA, ... etc.
Little inconvenience as I indicated is that must clear the sprite buffer if you change the size of the renderer, this is the reason to highlight the script as a beta, but it's ready for use as is. I wrote it just to help Marco Brunetta and I don't plan to extend or update this script, but you feel free to modify and further developed it.
Here are some ideas in this respect which may try:
[-] to have the freedom to add frames of different size in the same buffer, make sprite buffer independent from rendered frame size and/or add UI controls to set fixed buffer size.
[-] change horizontal to vertical order arrangement or...
[-] replace it with matrix/table arrangement like a MaterialEditor by 3x3, 6x4, etc.
[-] if you made thumbnails (to say for your meshes), they could be stored in one file.
[-] also separate UVW maps could be stored in one bitmap file.
[-] compose array of sequences for animated UVW maps.
[-] write vitrual animated preview (without the disk storage), but this also will need to write player to watch the preview.
[-] and so on ...
Download the script here
Must say that I wrote the script specifically for ScriptSpot.com so here a link to the publication.
Categories:
MAXScript,
News,
Render,
Tip n Tricks
Sunday, June 21, 2009
Scripted countdown counter
Scripted countdown counter using text shape and swap animation. Described method here is easier, not the best one. I was add enough comments in the source code, read them and evaluate (run) script part-by-part to see and understand it better.
Get it here
Get it here
Cut a hole in an object without Boolean
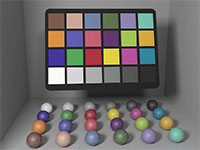
Boolean is too old ops in Max, comes to help mesh modeling. In addition to creating problems in the geometry of the objects, Boolean create errors in textured objects. So it is good to avoid it whenever possible. And Editable Polys has a good arsenal of options. Here I'll focus only on one example - cuting a hole in an object without Boolean. Trick is simply to use Bridge poly-ops :) This is very simple example, you can see Bridge options by pressing square button to the right of the main button.
Categories:
Basic,
Modeling,
Tip n Tricks,
Tutorials
Saturday, June 20, 2009
Thursday, June 18, 2009
Fake Caustics
This tutorial is done with 3DStudio Max 3.0 but can be done with any rendering-software which got the features you need for fake-caustics (that’s: colored shadows and falloff transparency).
Wednesday, June 17, 2009
Multi/Sub-Object instancing trick
if you are still not familiar with this trick, then it will be useful.
Read it at 3DS Max Rendering blog.
Categories:
Render,
Tip n Tricks,
Tutorials
Gamma correct
Tutorial by Martin Breidt
"What is gamma? Why do we have it? When should I perform gamma correction? And what happens if I just ignore it?"
The article is very general and is applicable to all CGI applications. Only in the second part, it contains information specific to 3ds Max.
Donload PDF here
NOTE: What i think, heh, shortly to say: correctGamma = undefined
Yes, will be good to say as Martin correctGamma = 2.2 , but think more about the standards. :)
Friday, June 12, 2009
Using Reactor Motor
by Aziz (RepublicOfCode.com)
How to create a simulation of a fan with the help of the Reactor Motor, Point Constraint, CSolver, and the Rigid Body Collection.
Thursday, June 11, 2009
Ozone 4.0 PLE
After Ozone 4 beta expired and this led to disappointment and negative feedback, E-on took a new step ad and now offer Personal Learninig Edition (PLE) for personal, non-commercial use only. Renders will watermarked but if true - E-on say: "the PLE never expires".
Scripted Box Animation
I made this script by user request in ScriptSpot.com forum
You can read the code in ScriptSpot forum or download the code here.
The final result:
You can read the code in ScriptSpot forum or download the code here.
The final result:
Monday, June 8, 2009
Procedural maps
The original title of this tutorial is "3D Planet Render", but focuses primarily on the use of Procedural maps techniques. Keep in mind, Procedural maps require more calculation than bitmaps, which means more time for rendering, so for that is good to bake 'em to texture to save a time. This is not a reason to avoid 'em. Always good to know how to do materials in Max without using bitmaps, also without the use of 2D software like Photoshop.
Categories:
Basic,
Materials,
Tip n Tricks,
Tutorials
Friday, June 5, 2009
Making an ants crowd
Posted by MaxFanatic's admin
Short desc.:
"Crowd" is an excellent tool that has come with Character Studion in 3dsmax. Today we will make a simple crowd animation where some ants are wandering while following a surface.
Wednesday, June 3, 2009
Wiring and Ink tricks
Wire Render
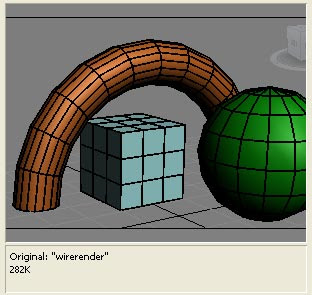
An easy way to make wire render is to apply "Edit Poly" modifier to your object and in Edge subObject level select all (Ctrl+A) edges, and press "Create Shape" button. Finnaly select created shape and set wirecolor to black, turn on "Enable In Renderer" and play with Thickness size.
The cool here is:
Ink style
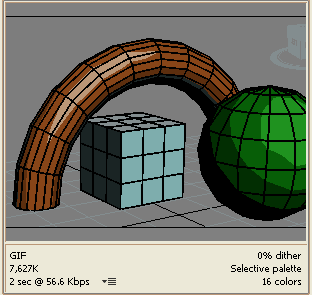
There is some 2D trick for Ink style using any kind of 2d graphic editor like Photoshop who can convert bitmaps to GIF file format. All what you need to do is to disable Dither (0%) and reduce colurs. See pictures below.
Of course for better result render diffuse and wire in separate passes.
An easy way to make wire render is to apply "Edit Poly" modifier to your object and in Edge subObject level select all (Ctrl+A) edges, and press "Create Shape" button. Finnaly select created shape and set wirecolor to black, turn on "Enable In Renderer" and play with Thickness size.
The cool here is:
- - you have full control over outline size
- - better antialiasing
- - fast rendering time
- - you can delete unwanted edges
Ink style
There is some 2D trick for Ink style using any kind of 2d graphic editor like Photoshop who can convert bitmaps to GIF file format. All what you need to do is to disable Dither (0%) and reduce colurs. See pictures below.
Of course for better result render diffuse and wire in separate passes.
Modeling tip and tricks
Some basic modeling tip and tricks by Per128
Categories:
Modeling,
Tip n Tricks,
Tutorials
Monday, June 1, 2009
Gold Material
In this tutorial you will learn how to make realistic Gold Material in 3ds max using simple technique with 4 easy steps.
Categories:
Materials,
Tip n Tricks,
Tutorials
Subscribe to:
Posts (Atom)